
What is a Sign Tray?
A sign tray is a highly popular, three-dimensional signage solution made from a single flat sheet of material. The edges of the material are folded backward at a 90-degree angle to create "returns" (sides), giving the sign depth and a robust, box-like appearance without the need for visible framing. This cavity hides fixings, wiring, and illumination hardware, resulting in a sleek, architectural finish.
Depending on the region or specific industry terminology, sign trays are also commonly referred to as:
-
Pan signs
-
Biscuit tin signs
-
Folded pans
(Insert your image of a commercial sign tray folded pan here)
Materials: Solid Aluminium vs. ACM
Sign trays are predominantly manufactured using one of two materials: Solid Aluminium or Aluminium Composite Material (ACM). The choice of material drastically changes the manufacturing process, cost, and final application.
Solid Aluminium
Solid aluminium sheets (typically 2mm or 3mm thick) are cut to size, and the corners are notched out. The edges are then folded using a sheet metal folder, and the corners are TIG welded together for structural integrity. The welds are ground smooth before the entire tray is painted or powder-coated.
ACM (Aluminium Composite Material)
ACM consists of two thin coil-coated aluminium sheets bonded to a non-aluminium core (usually polyethylene). Standard thickness for sign-making is 3mm. Because it cannot be welded, ACM is routed and folded. The corners are then secured using structural adhesives combined with either aluminium corner angles or extra ACM reinforcements.
Material Comparison:
| Feature | Solid Aluminium | ACM (Aluminium Composite Material) |
| Strength & Durability | High: Welded corners provide massive structural integrity; ideal for high-wind areas. | Moderate: Excellent for standard retail and commercial applications, but less rigid at massive scales. |
| Cost | Higher: Expensive raw material and labor-intensive (welding, grinding, painting). | Lower: Cost-effective material, fast CNC production, and comes pre-finished. |
| Weight | Heavy: Requires more robust wall fixings and mounting systems. | Lightweight: Easy to handle, transport, and install on standard facades. |
| Finishing | Must be finished after fabrication (powder coating, wet painting). | Comes pre-finished in standard colors, brushed metals, or can be vinyl-wrapped. |
Measuring for a Sign Tray
Getting the dimensions right is critical, and it primarily comes down to understanding the difference between the external face size and the internal face size (the clearance inside the tray).
-
Fitting Over an Existing Frame: If the tray needs to sleeve over an existing sub-frame or backing board, measuring accurately is essential. You must measure the exact external dimensions of the frame and then add an adequate allowance to determine the external size of your tray. Generally, adding around 8mm to your overall dimensions is standard. This accounts for the thickness of the material itself (e.g., 3mm ACM), the internal reinforcement angles, and the layer of structural adhesive. If you do not add this tolerance, the tray will not fit over the frame.
-
Stand-Alone Mounting (No Frame): If the tray is being mounted directly to a flat wall without sleeving over an existing structure, you don't need to worry about internal clearances. You can specify the external face size freely based entirely on the desired visual footprint.
Variations of Sign Trays
The versatility of the sign tray allows for several distinct visual styles, primarily dictated by how graphics and illumination are applied.
-
Standard Flat Face: The most basic form. The tray face is left solid, and graphics are applied via self-adhesive vinyl (SAV), digital flatbed printing, or built-up acrylic letters mounted directly to the surface.
-
Fret Cut with Acrylic Opal Backing: A CNC router cuts logos or text entirely out of the tray face. A flat sheet of translucent opal acrylic is bonded to the inside of the tray behind the cutouts. When illuminated from within, only the cut-out shapes glow.
-
Fret Cut with Push-Throughs: Similar to the above, but instead of a flat sheet behind the face, thick 3D acrylic letters (usually 10mm–20mm thick) are precision-cut and pushed through the fret-cut holes from the inside out. This creates a premium, illuminated 3D effect.
(Insert your image of fret cut sign tray with push through acrylic letters here)
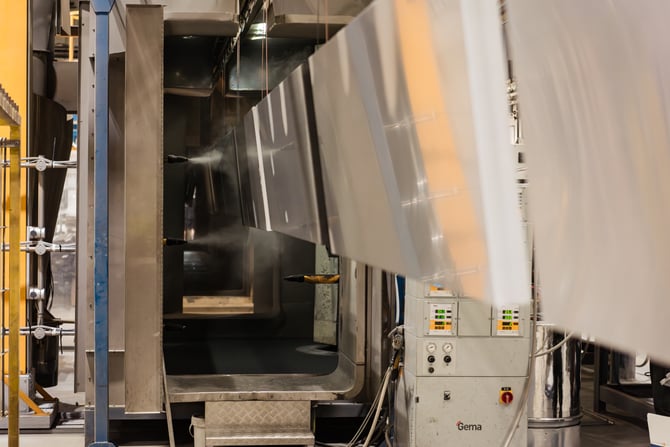
Manufacturing: V-Grooved ACM Trays on a CNC
Unlike solid aluminium, which requires a heavy-duty metal folder, ACM trays are created using a CNC router.
To create the precise 90-degree returns, the CNC router is fitted with a specialized V-shaped routing bit. The machine runs along the exact dimensions of the fold lines, cutting through the top aluminium skin and the plastic core, but stopping mere fractions of a millimeter before the bottom aluminium skin.
This process removes the bulk of the material, leaving the ultra-thin bottom layer of aluminium entirely intact. This remaining layer acts as a flexible, continuous hinge, allowing the sign maker to easily fold the edges up by hand to create perfect, crisp 90-degree returns.
(Insert your image of CNC V-grooving ACM here)
Assembly: Bonding with Stykra 360
Because ACM cannot be welded, the folded returns must be bonded together at the corners to hold the tray's shape. This is done by bonding either an aluminium right-angle bracket or additional strips of ACM into the internal corners. The industry standard adhesive for this process is Stykra 360, a high-performance structural methacrylate adhesive.
Stykra 360 is considered the best adhesive for ACM trays for three critical reasons:
-
Fast Setting: It drastically reduces clamping and holding time, allowing production to move quickly.
-
Crystal Clear Finish: Unlike traditional industrial glues that cure into ugly yellow or milky pastes, Stykra 360 is completely clear, ensuring no unsightly adhesive lines are visible if any seeps near the joints.
-
Low Heat Cure (Eliminates "Read-Through"): Most two-part structural adhesives undergo an exothermic chemical reaction as they cure, generating significant heat. This heat can warp and distort the thin 0.3mm aluminium face of the ACM, causing visible dimples or "read-through" markings on the front of the sign. Stykra 360 is specifically formulated to cure with very low heat, protecting the pristine flat face of the sign tray.
Installation: Fixing Trays to the Wall
There are two primary methods for mounting a sign tray, depending on whether the sign is unlit or illuminated.
1. Standard Wall Fixing (Aluminium Angle)
For standard, non-illuminated trays, the most common and cost-effective method utilizes continuous lengths of aluminium angle (commonly referred to as fixing rails).
-
The Process: The aluminium angle is leveled and screwed directly and securely to the wall or substrate—one length for the top return, and one for the bottom. The sign tray is then lifted and "hung" over the top angle, allowing the bottom return to sit flush against the bottom angle.
-
The Fix: Once perfectly positioned, the installer drives discreet, color-matched countersunk screws through the top and bottom returns of the sign tray directly into the aluminium angle. This holds the tray tightly to the wall while keeping the face of the sign completely free of visible screw heads.
2. Back Trays (For Illumination)
If the sign is illuminated (like a fret-cut design), it requires a secure housing for LED modules and wiring. This is achieved using a Back Tray.
-
A back tray is a secondary, shallower pan folded slightly smaller than the main sign tray.
-
It is screwed directly to the wall, and LED modules are uniformly applied to its face.
-
The main external sign tray is then "sleeved" over the back tray like a lid on a box and secured with screws through the returns, completely encapsulating the lighting system.
Finishing Options
While ACM often comes in pre-finished colors, both ACM and solid aluminium trays can be customized:
-
Powder Coating: (Solid Aluminium only). A dry powder is applied electrostatically and cured under heat for an incredibly tough, factory-grade finish.
-
Wet Painting: Ideal for exact Pantone color matching using automotive-grade paints.
-
Vinyl Wrapping: Applying an architectural or commercial vinyl film over the face and returns. Excellent for intricate printed patterns or gradients.
Flat Pack Trays
Transporting fully assembled sign trays can be a logistical nightmare; they are bulky, take up massive amounts of van space, and the corners are highly susceptible to damage during transit.
Flat pack trays solve this. The material is CNC routed, V-grooved, and fret-cut at the factory, but shipped completely flat. This heavily reduces shipping costs and virtually eliminates transit damage. Once on-site or at the local workshop, the installer simply folds the returns by hand and bonds the corners using an adhesive like Stykra 360.
For quick quotes and dimension planning, you can use online tools such as the Sign Trade Supplies Flat Pack Tray Calculator to input custom sizes and receive instant configurations for your flat pack projects.